Showing posts with label Tips & tricks. Show all posts

Wednesday, September 23, 2020

Rank Function in MS Excel

What it Does?

This function calculates the position of a value in a list, relative to the other values in the list. A typical usage would be to rank the Marks of students in a exam to find the topper. The ranking can be done on an ascending (low to high) or descending (high to low) basis.

If there are duplicate values in the list, they will be assigned the same rank. Subsequent ranks would not follow on sequentially, but would take into account the fact that there were duplicates. If the numbers 30, 20, 20 and 10 were ranked, 30 is ranked as 1, both 20's are ranked as 2, and the 10 would be ranked as 4

Syntax:                       

=RANK(NumberToRank,ListOfNumbers,RankOrder)


The RankOrder can be 0 zero or 1. Using 0 will rank larger numbers at the top. (This is optional, leaving it out has the same effect). Using 1 will rank small numbers at the top.                            

Example:                     

The following table was used to record the times for athletes competing in a race.                            
The =RANK() function was then used to find their race positions based upon the finishing times.     

In this example, the athlete who completes the race in lesser time will be shown in the 1st position and so on.

Rank Function Example GIF Image
Rank Function Example


Spell INR Amount into Words

In the Microsoft Excel there is no default function that displays the numbers into words in a worksheet, but you can add this capability by creating your own function by pasting the following SpellNumber function code into a VBA (Visual Basic for Applications) module. 

This function lets you convert the Rupees and Paise into words with a formula, so ₹786.99 would read as Rupees Seven Hundred Eighty Six and Paise Ninety Nine Only . This can be very useful if you're using Excel as a template to print Cheques/Checks.

To add this function into your workbook, please follow the beneath steps:

  1. Open the workbook where you want to spell the numbers.
  2. Press Alt+F11 key from your keyboard to open the Visual Basic Editor (VBE) window.
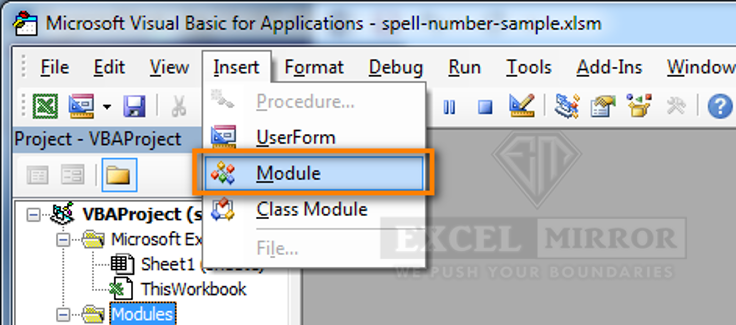
  3. Click the Insert tab in the VBE, and click on the Module option

    VBE - Insert Module Image
    VBE - Insert Module


  4. You will see a window named YourWorkBook Name - Module1 as shown in the below screenshot:

    Code window in Module Image
    Code window in Module

  5. Copy and Paste the following lines of codes in this module:
  6. Function SpellNumber(ByVal MyNumber, Optional incRupees As Boolean = True)
    Dim Crores, Lakhs, Rupees, Paise, Temp
    Dim DecimalPlace As Long, Count As Long
    Dim myLakhs, myCrores
    ReDim Place(9) As String
    Place(2) = " Thousand ": Place(3) = " Million "
    Place(4) = " Billion ": Place(5) = " Trillion "
    ' String representation of amount.
    MyNumber = Trim(Str(MyNumber))
    ' Position of decimal place 0 if none.
    DecimalPlace = InStr(MyNumber, ".")
    ' Convert Paise and set MyNumber to Rupees amount.
    If DecimalPlace > 0 Then
    Paise = GetTens(Left(Mid(MyNumber, DecimalPlace + 1) & "00", 2))
    MyNumber = Trim(Left(MyNumber, DecimalPlace - 1))
    End If
    myCrores = MyNumber \ 10000000
    myLakhs = (MyNumber - myCrores * 10000000) \ 100000
    MyNumber = MyNumber - myCrores * 10000000 - myLakhs * 100000
    Count = 1
    Do While myCrores <> ""
    Temp = GetHundreds(Right(myCrores, 3))
    If Temp <> "" Then Crores = Temp & Place(Count) & Crores
    If Len(myCrores) > 3 Then
    myCrores = Left(myCrores, Len(myCrores) - 3)
    Else
    myCrores = ""
    End If
    Count = Count + 1
    Loop
    Count = 1
    Do While myLakhs <> ""
    Temp = GetHundreds(Right(myLakhs, 3))
    If Temp <> "" Then Lakhs = Temp & Place(Count) & Lakhs
    If Len(myLakhs) > 3 Then
    myLakhs = Left(myLakhs, Len(myLakhs) - 3)
    Else
    myLakhs = ""
    End If
    Count = Count + 1
    Loop
    Count = 1
    Do While MyNumber <> ""
    Temp = GetHundreds(Right(MyNumber, 3))
    If Temp <> "" Then Rupees = Temp & Place(Count) & Rupees
    If Len(MyNumber) > 3 Then
    MyNumber = Left(MyNumber, Len(MyNumber) - 3)
    Else
    MyNumber = ""
    End If
    Count = Count + 1
    Loop
    Select Case Crores
    Case "": Crores = ""
    Case "One": Crores = " One Crore "
    Case Else: Crores = Crores & " Crores "
    End Select
    Select Case Lakhs
    Case "": Lakhs = ""
    Case "One": Lakhs = " One Lakh "
    Case Else: Lakhs = Lakhs & " Lakhs "
    End Select
    Select Case Rupees
    Case "": Rupees = "Zero "
    Case "One": Rupees = "One "
    Case Else:

    Rupees = Rupees
    End Select
    Select Case Paise
    Case "": Paise = " And Paise Zero Only "
    Case "One": Paise = " And Paise One Only "
    Case Else: Paise = " And Paise " & Paise & " Only "
    End Select
    SpellNumber = IIf(incRupees, "Rupees ", "") & Crores & _
    Lakhs & Rupees & Paise
    End Function
    ' Converts a number from 100-999 into text
    Private Function GetHundreds(ByVal MyNumber)
    Dim Result As String
    If Val(MyNumber) = 0 Then Exit Function
    MyNumber = Right("000" & MyNumber, 3)
    ' Convert the hundreds place.
    If Mid(MyNumber, 1, 1) <> "0" Then
    Result = GetDigit(Mid(MyNumber, 1, 1)) & " Hundred "
    End If
    ' Convert the tens and ones place.
    If Mid(MyNumber, 2, 1) <> "0" Then
    Result = Result & GetTens(Mid(MyNumber, 2))
    Else
    Result = Result & GetDigit(Mid(MyNumber, 3))
    End If
    GetHundreds = Result
    End Function
    ' Converts a number from 10 to 99 into text.
    Private Function GetTens(TensText)
    Dim Result As String
    Result = "" ' Null out the temporary function value.
    If Val(Left(TensText, 1)) = 1 Then ' If value between 10-19...
    Select Case Val(TensText)
    Case 10: Result = "Ten"
    Case 11: Result = "Eleven"
    Case 12: Result = "Twelve"
    Case 13: Result = "Thirteen"
    Case 14: Result = "Fourteen"
    Case 15: Result = "Fifteen"
    Case 16: Result = "Sixteen"
    Case 17: Result = "Seventeen"
    Case 18: Result = "Eighteen"
    Case 19: Result = "Nineteen"
    Case Else
    End Select
    Else ' If value between 20-99...
    Select Case Val(Left(TensText, 1))
    Case 2: Result = "Twenty "
    Case 3: Result = "Thirty "
    Case 4: Result = "Forty "
    Case 5: Result = "Fifty "
    Case 6: Result = "Sixty "
    Case 7: Result = "Seventy "
    Case 8: Result = "Eighty "
    Case 9: Result = "Ninety "
    Case Else
    End Select
    Result = Result & GetDigit _
    (Right(TensText, 1)) ' Retrieve ones place.
    End If
    GetTens = Result
    End Function
    ' Converts a number from 1 to 9 into text.
    Function GetDigit(Digit)
    Select Case Val(Digit)
    Case 1: GetDigit = "One"
    Case 2: GetDigit = "Two"
    Case 3: GetDigit = "Three"
    Case 4: GetDigit = "Four"
    Case 5: GetDigit = "Five"
    Case 6: GetDigit = "Six"
    Case 7: GetDigit = "Seven"
    Case 8: GetDigit = "Eight"
    Case 9: GetDigit = "Nine"
    Case Else: GetDigit = ""
    End Select
    End Function


  7. Press Ctrl+S to save the updated workbook.

    Note: When you try to save the workbook with a macro you'll get the message "The following features cannot be saved in macro-free workbook"

    Cannot Save VBproject Image
    Cannot Save VB Project

    Click No. When you see a new dialog, chose the Save As option. In the field "Save as type" pick the option "Excel macro-enabled workbook".

    SaveAs Macro Enabled Excel Workbook Image
    SaveAs Macro Enabled Excel Workbook

    Congratulations! Now, you have added the SpellNumber UDF Function to your workbook successfully.


Use SpellNumber function in your worksheets

Now you can use the function SpellNumber in your Excel Workbook. Enter =SpellNumber(A12) into the cell where you need to get the number written in words. Here A12 is the address of the cell with the number or amount. 
 
Spell Number Function Example GIF Image
Spell Number Function Example

Other Related UDF Functions:


Spell USD Amount into Words

In the Microsoft Excel there is no default function that displays the numbers into English words in a worksheet, but you can add this capability by creating your own function by pasting the following SpellNumberToEnglish function code into a VBA (Visual Basic for Applications) module. 

This function lets you convert the dollar and cent amounts to words with a formula, so $549.99 would read as Five Hundred Forty Nine Dollars and Ninety Nine Cents. This can be very useful if you're using Excel as a template to print Cheques/Checks. 


To add this function into your workbook, please follow the beneath steps:

  1. Open the workbook where you want to spell the numbers.
  2. Press Alt+F11 key from your keyboard to open the Visual Basic Editor (VBE) window.
  3. Click the Insert tab in the VBE, and click on the Module option

    VBE - Insert Module Image
    VBE - Insert Module

  4. You will see a window named YourWorkBook Name - Module1 as shown in the below screenshot:

    Code window in Module Image
    Code window in Module


  5. Copy and Paste the following lines of codes in this module:
  6. Function SpellNumberToEnglish (ByVal pNumber)
    Dim arr, xDecimal, xIndex, xHundred, xValue As Variant
    Dim Dollars, Cents
    arr = Array("", "", " Thousand ", " Million ", " Billion ", " Trillion ")
    pNumber = Trim(Str(pNumber))
    xDecimal = InStr(pNumber, ".")
    If xDecimal > 0 Then
    Cents = GetTens(Left(Mid(pNumber, xDecimal + 1) & "00", 2))
    pNumber = Trim(Left(pNumber, xDecimal - 1))
    End If
    xIndex = 1
    Do While pNumber <> ""
    xHundred = ""
    xValue = Right(pNumber, 3)
    If Val(xValue) <> 0 Then
    xValue = Right("000" & xValue, 3)
    If Mid(xValue, 1, 1) <> "0" Then
    xHundred = GetDigit(Mid(xValue, 1, 1)) & " Hundred "
    End If
    If Mid(xValue, 2, 1) <> "0" Then
    xHundred = xHundred & GetTens(Mid(xValue, 2))
    Else
    xHundred = xHundred & GetDigit(Mid(xValue, 3))
    End If
    End If
    If xHundred <> "" Then
    Dollars = xHundred & arr(xIndex) & Dollars
    End If
    If Len(pNumber) > 3 Then
    pNumber = Left(pNumber, Len(pNumber) - 3)
    Else
    pNumber = ""
    End If
    xIndex = xIndex + 1
    Loop
    Select Case Dollars
    Case ""
    Dollars = "No Dollars"
    Case "One"
    Dollars = "One Dollar"
    Case Else
    Dollars = Dollars & " Dollars"
    End Select
    Select Case Cents
    Case ""
    Cents = " And No Cents"
    Case "One"
    Cents = " And One Cent"
    Case Else
    Cents = " And " & Cents & " Cents"
    End Select
    SpellNumberToEnglish = Dollars & Cents
    End Function
    Private Function GetTens(pTens)
    Dim Result As String
    Result = ""
    If Val(Left(pTens, 1)) = 1 Then
    Select Case Val(pTens)
    Case 10: Result = "Ten"
    Case 11: Result = "Eleven"
    Case 12: Result = "Twelve"
    Case 13: Result = "Thirteen"
    Case 14: Result = "Fourteen"
    Case 15: Result = "Fifteen"
    Case 16: Result = "Sixteen"
    Case 17: Result = "Seventeen"
    Case 18: Result = "Eighteen"
    Case 19: Result = "Nineteen"
    Case Else
    End Select
    Else
    Select Case Val(Left(pTens, 1))
    Case 2: Result = "Twenty "
    Case 3: Result = "Thirty "
    Case 4: Result = "Forty "
    Case 5: Result = "Fifty "
    Case 6: Result = "Sixty "
    Case 7: Result = "Seventy "
    Case 8: Result = "Eighty "
    Case 9: Result = "Ninety "
    Case Else
    End Select
    Result = Result & GetDigit(Right(pTens, 1))
    End If
    GetTens = Result
    End Function
    Private Function GetDigit(pDigit)
    Select Case Val(pDigit)
    Case 1: GetDigit = "One"
    Case 2: GetDigit = "Two"
    Case 3: GetDigit = "Three"
    Case 4: GetDigit = "Four"
    Case 5: GetDigit = "Five"
    Case 6: GetDigit = "Six"
    Case 7: GetDigit = "Seven"
    Case 8: GetDigit = "Eight"
    Case 9: GetDigit = "Nine"
    Case Else: GetDigit = ""
    End Select
    End Function
  7. Press Ctrl+S to save the updated workbook.

    Note: When you try to save the workbook with a macro you'll get the message "The following features cannot be saved in macro-free workbook"

    Cannot Save VBproject Image
    Cannot Save VB Project


    Click No. When you see a new dialog, chose the Save As option. In the field "Save as type" pick the option "Excel macro-enabled workbook".

    SaveAs Macro Enabled Excel Workbook Image
    SaveAs Macro Enabled Excel Workbook

    Congratulations! Now, you have added the SpellNumberToEnglish UDF Function to your workbook successfully.

Use SpellNumberToEnglish function in your worksheets


Now you can use the function SpellNumberToEnglish in your Excel Workbook. Enter =SpellNumberToEnglish(A2) into the cell where you need to get the number written in words. Here A2 is the address of the cell with the number or amount. 
 
Spell Number To English Function Example GIF Image
Spell Number To English Function Example

Other Related UDF Functions:


UDF to Spell INR Amount into Words

Spell Numbers into Words

In the Microsoft Excel there is no default function that displays the numbers into words in a worksheet, but you can add this capability by creating your own function by pasting the following WordNum function code into a VBA (Visual Basic for Applications) module. 

This function lets you convert or spell any number into words with a formula, so 4,563.76 would read as Four thousand Five hundred and Sixty Three point Seven Six.

To add this function into your workbook, please follow the beneath steps:

  1. Open the workbook where you want to spell the numbers.
  2. Press Alt+F11 key from your keyboard to open the Visual Basic Editor (VBE) window.
  3. Click the Insert tab in the VBE, and click on the Module option

    VBE - Insert Module Image
    VBE - Insert Module

  4. You will see a window named YourWorkBook Name - Module1 as shown in the below screenshot:

    Code window in Module Image
    Code window in Module


  5. Copy and Paste the following lines of codes in this module:
  6. Option Explicit

    'Use function "WordNum"

    Public Numbers As Variant, Tens As Variant

    Private Sub SetNums()
    Numbers = Array("", "One", "Two", "Three", "Four", "Five", "Six", "Seven", "Eight", "Nine", "Ten", "Eleven", "Twelve", "Thirteen", "Fourteen", "Fifteen", "Sixteen", "Seventeen", "Eighteen", "Nineteen")
    Tens = Array("", "", "Twenty", "Thirty", "Forty", "Fifty", "Sixty", "Seventy", "Eighty", "Ninety")
    End Sub

    Function WordNum(MyNumber As Double) As String
    Dim DecimalPosition As Integer, ValNo As Variant, StrNo As String
    Dim NumStr As String, n As Integer, Temp1 As String, Temp2 As String
    ' This macro was written by Chris Mead - www.MeadInKent.co.uk
    If Abs(MyNumber) > 999999999 Then
    WordNum = "Value too large"
    Exit Function
    End If
    SetNums
    ' String representation of amount (excl decimals)
    NumStr = Right("000000000" & Trim(Str(Int(Abs(MyNumber)))), 9)
    ValNo = Array(0, Val(Mid(NumStr, 1, 3)), Val(Mid(NumStr, 4, 3)), Val(Mid(NumStr, 7, 3)))
    For n = 3 To 1 Step -1 'analyse the absolute number as 3 sets of 3 digits
    StrNo = Format(ValNo(n), "000")
    If ValNo(n) > 0 Then
    Temp1 = GetTens(Val(Right(StrNo, 2)))
    If Left(StrNo, 1) <> "0" Then
    Temp2 = Numbers(Val(Left(StrNo, 1))) & " hundred"
    If Temp1 <> "" Then Temp2 = Temp2 & " and "
    Else
    Temp2 = ""
    End If
    If n = 3 Then
    If Temp2 = "" And ValNo(1) + ValNo(2) > 0 Then Temp2 = "and "
    WordNum = Trim(Temp2 & Temp1)
    End If
    If n = 2 Then WordNum = Trim(Temp2 & Temp1 & " thousand " & WordNum)
    If n = 1 Then WordNum = Trim(Temp2 & Temp1 & " million " & WordNum)
    End If
    Next n
    NumStr = Trim(Str(Abs(MyNumber)))
    ' Values after the decimal place
    DecimalPosition = InStr(NumStr, ".")
    Numbers(0) = "Zero"
    If DecimalPosition > 0 And DecimalPosition < Len(NumStr) Then
    Temp1 = " point"
    For n = DecimalPosition + 1 To Len(NumStr)
    Temp1 = Temp1 & " " & Numbers(Val(Mid(NumStr, n, 1)))
    Next n
    WordNum = WordNum & Temp1
    End If
    If Len(WordNum) = 0 Or Left(WordNum, 2) = " p" Then
    WordNum = "Zero" & WordNum
    End If
    End Function

    Function GetTens(TensNum As Integer) As String
    ' Converts a number from 0 to 99 into text.
    If TensNum <= 19 Then
    GetTens = Numbers(TensNum)
    Else
    Dim MyNo As String
    MyNo = Format(TensNum, "00")
    GetTens = Tens(Val(Left(MyNo, 1))) & " " & Numbers(Val(Right(MyNo, 1)))
    End If
    End Function
  7. Press Ctrl+S to save the updated workbook.

    Note: When you try to save the workbook with a macro you'll get the message "The following features cannot be saved in macro-free workbook"

    Cannot Save VBproject Image
    Cannot Save VB Project


    Click No. When you see a new dialog, chose the Save As option. In the field "Save as type" pick the option "Excel macro-enabled workbook".

    SaveAs Macro Enabled Excel Workbook Image
    SaveAs Macro Enabled Excel Workbook

    Congratulations! Now, you have added the WordNum UDF Function to your workbook successfully.

Use WordNum function in your worksheets


Now you can use the function WordNum in your Excel Workbook. Enter =WordNum(A22) into the cell where you need to get the number written in words. Here A22 is the address of the cell with the number. 
 
WordNum Function Example GIF Image
WordNum Function Example

Other Related UDF Functions:


UDF to Spell INR Amount into Words


Monday, August 31, 2020

How to Assign a Macro

In this tutorial we are going to explain how you can Assign a Macro to the Command Button in the Microsoft Excel.

To assign a macro (one or more code lines) to the command button, execute the following steps:
  1. Right click CommandButton1 (make sure Design Mode is selected).
  2. Click View Code.

    View Code Image
    View Code
    The Visual Basic Editor appears.

  3. Place your cursor between Private Sub CommandButton1_Click() and End Sub.
  4. Add the code line shown below:
        Range("A1").Value = "Hello"
    
    Add Code Line Image
    Add Code Line
    Note: The window on the left with the name Sheet1 (Sheet1) and ThisWorkbook is called the Project Explorer. If the Project Explorer is not visible, click on View menu and then click on Project Explorer. If the Code window for Sheet1 is not visible, click Sheet1 (Sheet1). You can ignore the Option Explicit statement for now.

  5. Close the Visual Basic Editor.
  6. Click the command button on the sheet (make sure Design Mode is deselected).

Result:

Macro Result Image
Macro Result
Congratulations. You've just created a macro in Excel!


Saturday, August 29, 2020

How to Insert a Command Button

In this tutorial we are going to explain how you can Insert the Command Button in the Microsoft Excel.

To place a command button into your worksheet, execute the following steps:
  1. In the Developer tab, click on Insert option.
  2. In the ActiveX Controls group, click on Command Button.

    Insert Command Button Control Image
    Insert Command Button Control

  3. Drag a command button on your worksheet.


Friday, August 28, 2020

How to Show Developer Tab

In this tutorial we are going to explain how you can turn on the Developer Tab in the Microsoft Excel.

To turn on the Developer tab, execute the following steps.
  1. Right click anywhere on the ribbon, and then click Customize the Ribbon (as shown in the below screenshot).

    Customize Ribbon Image
    Customize Ribbon
    Alternatively, you can go to File Menu then Click on Options and then click on Customize the Ribbon option shown in the left pane of the Excel Options window, the same window will open as shown you in the below image.

  2. Under Customize the Ribbon, on the right side of the dialog box, select Main tabs (if necessary).
  3. Check the Developer check box.

    Turn On Developer Tab Image
    Turn On Developer Tab
  4. Click OK.
  5. You can find the Developer tab next to the View tab.

    Developer Tab Image
    Developer Tab


Thursday, August 27, 2020

How to Open Visual Basic Editor

In this tutorial we are going to explain how you can open the Visual Basic Editor in the Microsoft Excel.

To open the Visual Basic Editor, Go to the Developer tab and then click on Visual Basic. OR Press Alt+F11 key from your keyboard.

Open Visual Basic Editor Image
Open Visual Basic Editor
The Visual Basic Editor appears.

Visual Basic Editor Image
Visual Basic Editor


Wednesday, August 26, 2020

Create Your First VBA Macro

In this tutorial, we are going to explain you the Basics of a VBA Macro in the Microsoft Excel and step-by-step guide to create your first VBA Macro.

What is a Macro?

A series of commands or instructions that are combined to form a single command are known as Macros. Macros are getting created by writing the VBA code with the set of instruction in the Visual Basic Editor of Microsoft Excel.

Benefits of a Macro

Macros can save your time by letting you automate relatively simple tasks that you need to perform often, as well as complex procedures that consist of many steps. 

In this tutorial, you will learn how to create a simple macro which will be executed after clicking on a command button. To do so, First, turn on the Developer tab.

Click on the below respective link to know, how to Turn On the Developer Tab or Insert Command Button or Assign a Macro to the command button or how to open Visual Basic Editor in the Microsoft Excel.

Developer Tab | Command Button | Assign a Macro | Visual Basic Editor


Developer Tab:

In this tutorial we are going to explain how you can turn on the Developer Tab in the Microsoft Excel.

To turn on the Developer tab, execute the following steps.
  1. Right click anywhere on the ribbon, and then click Customize the Ribbon (as shown in the below screenshot).

    Customize Ribbon Image
    Customize Ribbon
    Alternatively, you can go to File Menu then Click on Options and then click on Customize the Ribbon option shown in the left pane of the Excel Options window, the same window will open as shown you in the below image.

  2. Under Customize the Ribbon, on the right side of the dialog box, select Main tabs (if necessary).
  3. Check the Developer check box.

    Turn On Developer Tab Image
    Turn On Developer Tab
  4. Click OK.
  5. You can find the Developer tab next to the View tab.

    Developer Tab Image
    Developer Tab


Command Button:

In this tutorial we are going to explain how you can Insert the Command Button in the Microsoft Excel.
 
To place a command button into your worksheet, execute the following steps:
  1. In the Developer tab, click on Insert option.
  2. In the ActiveX Controls group, click on Command Button.

    Insert Command Button Control Image
    Insert Command Button Control

  3. Drag a command button on your worksheet.


Assign a Macro:

In this tutorial we are going to explain how you can Assign a Macro to the Command Button in the Microsoft Excel.

To assign a macro (one or more code lines) to the command button, execute the following steps:
  1. Right click CommandButton1 (make sure Design Mode is selected).
  2. Click View Code.

    View Code Image
    View Code
    The Visual Basic Editor appears.

  3. Place your cursor between Private Sub CommandButton1_Click() and End Sub.
  4. Add the code line shown below:
        Range("A1").Value = "Hello"
    
    Add Code Line Image
    Add Code Line
    Note: The window on the left with the name Sheet1 (Sheet1) and ThisWorkbook is called the Project Explorer. If the Project Explorer is not visible, click on View menu and then click on Project Explorer. If the Code window for Sheet1 is not visible, click Sheet1 (Sheet1). You can ignore the Option Explicit statement for now.

  5. Close the Visual Basic Editor.
  6. Click the command button on the sheet (make sure Design Mode is deselected).

Result:

Macro Result Image
Macro Result
Congratulations. You've just created a macro in Excel!


Visual Basic Editor

In this tutorial we are going to explain how you can open the Visual Basic Editor in the Microsoft Excel.

To open the Visual Basic Editor, Go to the Developer tab and then click on Visual Basic.

Open Visual Basic Editor Image
Open Visual Basic Editor
The Visual Basic Editor appears.

Visual Basic Editor Image
Visual Basic Editor


Friday, June 26, 2020

How to Open A Workbook through VBA Code

Sometimes we may want to open an existing workbook using VBA. You can set the opened workbook to an object, so that it is easy to refer your workbook to do further tasks.Open a closed workbook is a very common task to perform using VBA.

To open a closed workbook you can use the Workbooks.Open function which takes the name, of the workbook along with the complete path to open, as an argument.

Below VBA code example will give you the more clarity on this:
Workbooks.Open Filename:="File_Name"    'Preferred Syntax
OR
Workbooks.Open "File_Name"


Where "File_Name" will be the complete path of the file i.e. "C:\Documents\Info.xlsx". So, to open this file the code would be as follows:
Sub Open_Workbook()
    Workbooks.Open Filename:="C:\Documents\Info.xlsx"
End Sub

Note: you can only open "Info.xlsx" without specifying the file's path if it's stored in your default file location. To change the default file location, on the File tab, click Options, Save.


You can also use the GetOpenFilename method of the Application object to display the standard Open dialog box.
Dim MyFile As String
MyFile = Application.GetOpenFilename()
A dialog box will open as shown below, Select a file and click Open.


Note: GetOpenFilename doesn't actually open the file.


Tuesday, June 23, 2020

Use of Debug Print in Excel VBA

Debug.Print is used to see that how your code works. It is very useful tool in VBA. Many people get confused about where the output ends up. This can be useful when you want to see the value of a variable in a certain line of your code, without having to store the variable somewhere in the workbook or show it in a message box.

Debug. Print is telling VBA to print that information in the Immediate Window. To view this window you can use the the shortcut key Ctrl + G

OR

Follow the Following steps:
  1. Open the Visual Basic Editor in Excel by pressing the Alt + F11 Key, then
  2. Go to the View Menu and then
  3. Select the Immediate Window option.
Note: Debug.Print will still write values to the window even if it is not visible.

Below is the Debug.Print example for your reference:

VBA-DebugPrint-Example


Saturday, May 9, 2020

Create a Custom Function in Excel - UDF

You can create your very own functions that do whatever you want it to; are called User Defined Functions or UDF and they are amazing.

To make these functions; we just need a little bit of VBA Coding since they are basically macros.

Steps to Create a UDF in Excel

  1. Hit Alt + F11 to go to the VBA Editor window


  2. Go to Insert > Module


  3. You should now see a window that looks like this:


  4. In that window type Function and the name of your function and then an open and closing parenthesis and then hit Enter. I named my function CountCharacters

  5. You can give your function basically any name that is not already used for functions.

    Once you do this, the window will automatically add End Function to the window and it should look something like this:


  6. Put some code within the function to make it do something.

  7. Here, I will simply set a variable equal to some text that I would like to output.
    outputText = "This is output."

  8. Now, we need to put the output of our function into a variable that has the SAME name as our function.

  9. To do this, I add this line of code to the bottom of the function's code:
    CountCharacters = outputText


  10. Hit Alt + F11 to go back to Excel and input the new function into a cell.


  11. Notice that when I start typing the name of the function it appears in the function list drop-down for Excel.

    When you finish entering the function hit Enter like you would with a regular function.

  12. That's it! Here is the final result.


  13. In this example, I created the simplest form of a UDF or User Defined Function.

Every UDF that you create will follow the basic structure outlined in this example, which is:

  1. Functions must start with Function and then the name you want to give that function and an open and closing parenthesis. Arguments can go into the parenthesis, as discussed below in another example.
  2. Functions must end with the text End Function, which the Excel VBA window will usually input for you.
  3. To generate the output for the function and send it back to Excel, you must assign the output of the function to a variable that has the exact same name as your function.


Adding Arguments to the Function


Let's now add an argument to the function in order to make it more useful.

Arguments are the parts of a function where you can input data, or select a cell that has data, that you want your function to use. Arguments are the way you get data into your function.

It's actually very simple; we just input text in-between the parenthesis after the name of the function, and that text will be the argument.

Let's start with the example we made above:


Now, add text in the parenthesis:


I put input_value as the argument. Note that you can't use spaces for the names, instead, separate words using underscores.

Now that we have input_value as an argument, we can use it within the function. This is how we get data from the user into the function.

To make this function more dynamic, since it currently only outputs the hardcoded text "This is output.", I will set the variableoutputText equal to the new argument input_value.


Go back to Excel (hit Alt + F11) and let's try this function on another cell.


Here is the result:


This simple function now outputs whatever text is given to it, in this case, the text from cell A1.


Multiple Arguments


You can have multiple arguments, just separate each one with a comma like this:
Function MyFunctionName(Argument_1, Argument_2, Etc.)

Using VBA within the Function


We are creating this function using VBA (Visual Basic for Applications), which is the same thing we use for regular macros. As such, we can do many interesting and powerful things. Now, functions can't do everything that a regular macro can do, because the goal of a function is to return a result back to the cell, but you can still do a lot.

Let's finish the function we started to create and make it count all of the characters that are in a cell.

To do this, we add the len VBA function, which is used to count the length of the value that you put inside of it.

I want to count the input to this function, which is provided through the input_value variable and so I need to put that inside the len function.

This:
outputText = input_value

Will become this:
outputText = len(input_value)


Since the rest of the function is already setup to output the value stored in the outputText variable, I don't need to change anything else.

Here is the final Function code:


Go back to Excel and try it now.


Output is:


We now have a function that counts how many characters are in a cell and gives us the result.


The Final Result: Custom Excel Function


This was a very simple example using VBA to create a function but you can include many lines of code depending on the complexity of what you are trying to do. In this example, I tried to keep things simple to help give you an idea of how everything works so you can build upon it.
Here is the final version of the code that was created:

Function CountCharacters(input_value)  
   
   outputText = Len(input_value)  
   
   CountCharacters = outputText  
   
 End Function


Notes


Custom Excel functions, or UDFs, are simply awesome. They are one of my favorite aspects of Excel because it allows you to easily create a function that does almost whatever you could want it to do. When you have repetitive tasks that take many steps or require a complex formula that is hard to remember, you can create a custom function to do the work for you.

The example that I created above is not a useful custom function on its own since there is already a LEN() function in Excel, but it should help you to understand how custom functions are made and used.

UDFs are only available in the workbook in which you have them or when that workbook is open and you are referencing them using the correct cross-workbook method, with is rather annoying. In another tutorial I will show you how to make them available everywhere.